The day you need to grind coffee without a coffee grinder is a sad day, indeed. For some reason you're faced with the need of coffee, but you have no grinder to speak of.
You've still got an army of utensils in your kitchen though, so there's definitely something we can work out. Literally, in some cases, since many of these will require lots of elbow grease.
I've arranged these methods according to what grid size is easier t get using each of them. You can pick which ever you like, or whichever is most comfortable for you.
And I'm also going to touch on why using the flat edge of a knife, or a blender, isn't the best idea for coffee.
Table of Contents
For fine and very fine ground coffee
You'll need a lot of elbow grease if you mean to grind your coffee to a fine or very fine grind. this is what you'll need for espresso, and for Turkish coffee as well.
And since most folks drink either espresso or drip-filter coffee, you have a high chance of needing this kind of grind.
The reason these two options (yes, you'll have 2 for each size) require so much input from you is because we need consistency in the grind, especially with espresso. A poor grind job leads to a poor espresso shot, so you need to be careful.
A mortar and pestle will get your coffee a fine, powdery grind
Not everyone owns a mortar and pestle, but I think plenty of people have this ancient but terribly useful device at home. It's useful in so many ways, and it's been literally the. same. ever since it came to be.
It if ain't broke don't fix it, right ?
The upside to using a mortar and pestle is that you have complete and absolute control of everything. The speed, the pressure, what size your coffee end up as, everything.
The downside is that you can only grind in small batches, and you're going to have to do all the work yourself. I guess you could crush the beans with a hammer before starting, and then use the mortar and pestle to grind them to a powder.
So, you'll be needing a mortar and pestle to begin with. If you have none, and this method appeals to you, then check out this one by ChefSofi.
It's a 6 inch, 2 cup capacity mortar, and comes with a pestle of the same set. It's pure heavy granite, so you're going to get a great grip on it as you crush and powder those coffee beans.
This mortar and pestle set comes with a self-adhesive protector pad for your counter, so it will be protected. It also doubles and anti-slip mat.
You can check the listing on Amazon here.
Once you've got your gear, add in as many beans as you'd like to crush for your cup of coffee. If you're going to espresso, you'll need 7-9 grams for a standard espresso shot.
Your beans will run around and be hard to pin down, which is why I recommend you first whack them with a meat tenderizer or something similar, to at least crack them.
Or, you could start pounding them right in the mortar, up to you.
Once your beans have started cracking, getting a hold of each piece and grinding it to a fine powder is easy enough, it just takes time. Apply constant pressure, and slightly twist the pestle to get each part of the coffee splinter ground.
You're going to do this for several minutes, and it's okay to set the mortar down, pick it back up, walk around with it, cuss at it, huff and puff, whatever you need to do.
There is no clear technique to this, just grind it as best you can. Try to get all pieces as even as you can.
You can stop at any point from coarse to medium to fine, but this is the best method to get fine and very fine ground coffee.
Roll/crush coffee with rolling pin in ziploc bag
If a mortar and pestle seems too much for you, or you'd like a more French chef way of making coffee, then get yourself an empty ziploc bag, and a rolling pin.
Fill the bag with the beans, and try to get out as much air as you can. Make sure to lock the bag tight. Get the thickest ziploc you can find, since the coffee may poke a hole in the bag.
Also place on your counter or table a kitchen rag or towel for the first couple of minutes. This is partly to dampen the sound, and partly to protect your kitchen from flying bits of coffee.
If everything's in order, place the bag with the coffee on the towel, lay it as flat as you can. Try to get only one layer of beans, so no overlapping beans.
Then, take out your rolling pin. It helps if you have an old timey wooden one, thick and heavy. You're going to first hit the coffee beans with the rolling pin, in a vertical motion.
Or, you can try crushing them with a rocking motion, rocking the pin from one end to another.
Once your beans crack, your can begin rolling them, applying constant pressure. Use more rocking motions as you see necessary.
This method will get you a fine and very fine grind size as well, just know that you might have to shake the coffee bag every now and then, to rearrange the bits and pieces so you don't grind the very small ones into a powder while aiming for the big ones.
If you're not able to crush them in the first place (they're not easy to pin down), you can always use a mallet or small hammer to get things started.
For medium, medium-large ground coffee
Now, if you're more of a medium, possibly medium fine or medium large grind size person, then you might find these options better.
A medium grind is useful for drip filters, Moka pots, Chemex, or any brewing method that takes about 3 minutes.
You'll know you've reached medium grind when the coffee looks about as large as crystalized sugar, or sea salt flakes.
Use a food processor to grind coffee
Your first option, and probably the one you're most likely to go for, is using a food processor. Not a blender, and I'll explain why not in a little bit, bear with me.
A food processor is usually going to be faster and stronger than a blender, and lots of folks happen to have one in the kitchen.
So, get the coffee beans out, and know that you're going to have to help things out here. You know how the blades aren't exactly on the bottom of the bowl, and there's about a half inch space ?
That's going to mean you have to tilt the processor a little, and only use short bursts of power, if you want a uniform grind. If you were to continuously run the food processor you'd end up with a very fine grind before you could stop it.
It also means that you can, and actually should use, a larger amount of beans than normal. This is because one way or another the beans must be on top of the blades.
Meaning each time the beans get ground to a small size, you'll have to shake the processor a little, so the larger bits come on top and the smaller ones end up on the bottom. This will ensure that you've got a layer or crushed beans touching the blades, at all times.
It won't be the most uniform ground coffee, that's true. But it'll work in a pinch.
You should also know that the heat from the spinning blades will make the natural oils in the coffee beans stick to everything. So your ground coffee might be a little greasy, as will the processor.
This depends heavily on the degree of roast you're using, and the bean type as well. As a general rule, darker roasts have more coffee oils showing on the surface.
If you have no food processor, then this one by Cuisinart will definitely be a good choice. It's a 3 cup version, and I think this is just the right size to grind coffee without taking up all the counter space.
It comes in several colors, you can can get whichever would fit your kitchen best.
Also know that this food processor comes with a 250 watt motor, and does come with a warning to not use for grinding beans because it chops. Which is fair, but we're in a bit of an emergency here, aren't we ?
You can check the listing on Amazon here.
Use a meat tenderizer or hammer, and then the rolling pin
If using the food processor isn't really your thing, then you can use the rolling pin method I mentioned earlier, but with a twist.
Again, you will need something like a hammer, mallet, meat tenderizer, anything of the sort that can crush and crack the coffee beans. Then, once your beans are opened, use the rolling pin on then.
Switch between a sideways rocking motion and a rolling one, and yes do use a closed ziploc bag to keep the coffee from flying everywhere.
Know that with this method you'll need a sharp eye for the differences between the coffee bits. After first cracking them with the hammer or a similar item, some parts will be larger, some will be smaller.
You will need to keep shaking the coffee bag to get the smaller and larger pieces separated, and keep rolling and rocking until you reach the size you want.
You can stop this at any point you like, as in medium coarse, medium, or medium fine, depending on what grind size you're aiming for.
For coarse ground coffee
Coarse ground coffee will be most useful when you're making cold brew coffee, or French press, since both of these brewing methods require a longer brewing time.
You'll know your coffee is coarsely ground when it's the size of Himalayan salt, or cracked peppercorns. Getting to this size is easy, since you might only need a couple of minutes.
But getting an even coarse grind is not easy, and requires patience.
Crush coffee with hammer, or meat tenderizer
One of the first things you can try is using a ziploc bag to hold the coffee beans, and hammer it into the size you want.
For this you need to place your beans in the bag, remove as much air from it as possible, and close it tightly.
You will definitely need a towel on the table or counter, under the bag, so not deafen everyone in the house.
Once everything is in place, make sure your beans are only in one layer, and not on top of each other. Then with short but firm strokes begin hammering the beans.
Ease into it, since you won't know how hard to hit at first if you want to just crack them. If you hit the coffee too hard you might just get medium or fine bits without meaning to.
So ease into it, and slowly but surely work your way to a coarse grind, hammering a little here, and a little there.
Keep in mind that some pieces will be smaller, and some larger. It can't really be helped. If you were to try and crack the larger ones you'd end up with medium sized ground coffee, so better just stop before you get there.
If all sizes are 'coarse', but some are a little larger than the others, better to just leaves them be and work with what you've got.
Try using a hand mincer to crush coffee beans
A hand mincer might not be in everyone's home, but if you've got one then by all means do use it in this case. It's one of the few methods of getting coarse ground coffee that actually gets you a fair result.
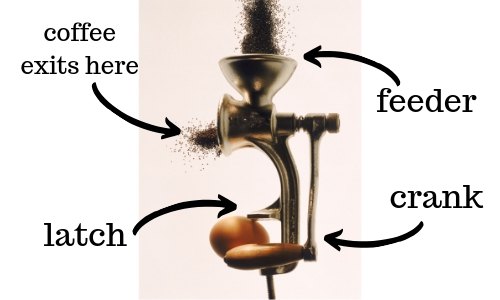
If you don't know what a hand mincer is, here is an example.
It's a manual meat mincer, with a crank at one end, an extruder at the other, and a feeder on top. You fit it on your table or kitchen counter and it grinds or minces.
When installing the mincer on your table, make sure it fits well and doesn't move around. That thing's heavy and you wouldn't want to test it on your toes.
You'll need to feed the coffee beans into the upper opening, and crank the machine until all the beans are out. At first they will be coarse , and you can stop there. No reason to go further.
But, if you want to go for medium, then you can run the ground beans through the machine again and get a smaller grind.
Unsafe - do not use a knife or blender
Alright, now you've got some options to safely grind coffee at home. But what about using a knife or blender ? You might've heard some people say they'd work well in a pinch.
Truth be told, they would. They can and do chop up coffee beans, but at a cost which made me not include them on this list.
Why you shouldn't use a knife to grind coffee beans
A knife can be used to grind coffee beans by cracking them with the wide, flat edge of the blade. This means that you need to push down on the beans using the flat of the blade.
The chance of slipping - coffee beans are hard and sometimes oily - and accidentally cutting your hand or sending the knife flying across the kitchen is too great.
This is not garlic we're crushing folks. Coffee is not soft, and no one has any business trying to crack hard beans with something that has a sharp edge.
Unless you're a ninja with amazing reflexes and a very steady hand I suggest you not use the flat of a knife to crack the beans. Really, there are so many other, safer, more reliable ways to do this.
Why you shouldn't use a blender to grind coffee beans
As for blenders, The reason I advise against using them is because they're not exactly made for crushing coffee beans. Even those blenders that can crush ice aren't meant to be used constantly for that.
Most commercial household blenders are meant to chop and puree softer foods, like veggies and a couple of nuts.
The blades can and do wear out, and crushing coffee beans is going to make that happen faster than anyone would like.
There is also the fact that a blender will get a little hot while you're using it, meaning the same thing with the food processor could happen - coffee oils everywhere.
And finally, coffee and its distinctive smell and flavor is hard to get rid of in appliances. You'll need to wash that blender several times to remove the odor.
Conclusion
Try and be on the safe side when MacGyvering anything, and this includes grinding coffee beans without a grinder.
The options I've talked about in this post are meant as a quick fix, and not at as a permanent solution. If grinding your own coffee is too much, then go for pre-ground coffee. You run a much smaller risk of hurting yourself.
If you want to know more about coffee or tea, feel free to check the related articles below. Who knows what else you might find ?


